Essential Manual for Gasket Heat Exchanger Installation

Proper gasket installation in a gasket heat exchanger protects equipment and people. Incorrect placement or damaged gaskets may cause leaks or even equipment failure. Careful attention during each step ensures the heat exchanger operates safely and efficiently. Regular inspection of every gasket keeps the system reliable for years.
Gasket Heat Exchanger Preparation
Proper preparation before installation sets the foundation for a reliable gasket heat exchanger. Following the right procedures ensures the equipment operates efficiently and safely. Shanghai Heat Transfer’s Gasketed Plate Heat Exchanger demonstrates advanced design and maintenance needs, similar to other leading brands. The preparation process involves gathering the correct tools and materials, selecting suitable gaskets, and cleaning all surfaces thoroughly. These guidelines help prevent leaks and extend the lifespan of the plate heat exchanger.
Tools and Materials
Technicians must use the right tools and materials during preparation. The following table outlines common materials used in plate heat exchanger gaskets and plates, each chosen for specific applications:
Material | Description |
|---|---|
Stainless steel 304 | Used for general organic and inorganic media, suitable for water, lubricating oil, etc. |
Stainless steel 316 | More resistant than 304, used for water, steam, oil, and low concentration acids and bases. |
254SMO | Suitable for salt water and inorganic acids, better than 316 in certain conditions. |
Titanium | Known for resistance to chlorine-ion corrosion, used for seawater and oxidizing acids. |
Titanium-Palladium Alloy | Excellent corrosion resistance to acidic media, suitable for high temperature and low pH solutions. |
Hastelloy C276 | Resistant to chloride ions in low pH media, used in various acids, especially sulfuric acid. |
Technicians should also prepare the following tools and supplies:
Soft brushes or pressure washers for cleaning
Soap and water for washing plates and gaskets
Crisscross-pattern torque wrenches for even tightening
Replacement plate heat exchanger gaskets in the correct material and size
Understanding the fluids in the system is crucial for selecting the right gasket material. Corrosive chemicals require highly resistant materials like fluoroelastomers or PTFE. Steam or hot water applications need high-temperature gaskets such as EPDMHT or NBRHT. High-viscosity fluids benefit from thicker, flexible gaskets that maintain a proper seal. Standard NBR or EPDM gaskets work well for moderate pressures and temperatures, while high-pressure environments need robust options like Viton or PTFE.
Gasket Selection
Selecting the correct gasket is a key step in preparation. Plate heat exchanger gaskets come in several materials, each with unique properties. The table below compares common gasket types:
Material | Best For | Temperature Range | Chemical Resistance | Pressure Range |
|---|---|---|---|---|
EPDM | Water, steam, mild chemicals | ~150°C (160°C short-term) | Excellent for water, ozone, mild acids | Low to moderate |
NBR | Hydrocarbons, oils, fuels | ~120°C | Excellent for oils and fuels | Moderate to high |
Viton (FKM) | High temp, high-pressure, aggressive chemicals | ~250°C | Excellent for acids, oils, fuels | High |
Technicians must match the gasket material to the fluids and operating conditions of the heat exchanger. EPDM gaskets resist water and mild chemicals, making them ideal for HVAC and food processing. NBR gaskets handle oils and fuels, suitable for chemical and power generation. Viton gaskets withstand high temperatures and aggressive chemicals, perfect for demanding industrial environments. Always follow the manufacturer's manual for specific guidelines on gasket selection.
Surface Cleaning
Surface cleaning is a critical procedure in preparation before installation. Clean plates and grooves ensure a tight seal and prevent leaks. Technicians should follow these steps:
Remove the old gasket and check its condition by pinching it. If reusable, wash with soap and water and hang to dry.
Clean loose debris from the plate using soap, water, and a soft brush or pressure washer. Avoid hard brushes that may damage the surface.
Ensure all debris is removed from the plate and grooves.
For stubborn adhesives, use hot acid or caustic solutions with care.
Gaskets must sit properly in their grooves without twists or folds. During the installation process, technicians should tighten bolts in a crisscross pattern to distribute pressure evenly. Clean surfaces and correct gasket placement help maintain the integrity of the gasket heat exchanger and prevent equipment failure.
Tip: Always refer to the manufacturer's manual for detailed procedures and safety guidelines. Proper preparation ensures long-term reliability and efficiency.
Shanghai Heat Transfer’s Gasketed Plate Heat Exchanger features easy maintenance, corrosion resistance, and high efficiency. Its modular structure allows quick disassembly for cleaning or part replacement, reducing downtime and supporting sustainable operations. Following these preparation steps helps technicians achieve optimal performance and safety in every heat exchanger installation.
Heat Exchanger Installation Steps
Removing Old Gaskets
Technicians begin the heat exchanger installation process by removing old gaskets from the plate heat exchanger. Old gaskets often lose their elasticity and sealing ability after long-term use. They must not reuse these gaskets because they deform during initial compression and cannot provide a reliable seal. During removal, technicians use soft tools to avoid scratching the plate surface. They inspect each plate for residue or damage. If adhesive remains, they apply a safe cleaning solution and gently scrub the grooves. This procedure ensures that the plate heat exchanger is ready for new gasket installation and prevents leaks caused by improper sealing.
Tip: Always dispose of old gaskets according to local environmental guidelines. Proper removal supports installation quality and equipment longevity.
Positioning New Gaskets
Correct positioning of new gaskets is essential for a secure seal in the gasket heat exchanger. Technicians handle each gasket with care to prevent damage. They avoid grease and ensure the gasket fits snugly in the groove. The following table outlines the main steps for positioning new gaskets:
Step | Description |
|---|---|
Proper Placement | Center the gasket on the flange face, especially in raised face flanges. |
No Re-use | Use only new gaskets, as reused ones may fail to seal properly. |
Handling | Handle gaskets gently to avoid tears or deformation. |
Technicians check that the gasket sits flat and does not twist or fold. They confirm that the gasket does not protrude into the flow path, which could disrupt fluid movement and cause leaks. Plate heat exchanger gaskets must match the plate design and material. Following these guidelines helps maintain the integrity of the heat exchanger and supports long-term equipment performance.
Plate Alignment
Plate alignment plays a critical role in preventing leaks and ensuring efficient heat transfer. Technicians stack plates horizontally and align them carefully. They use the following techniques to achieve proper alignment:
Center the plate on the heat exchanger frame.
Ensure no gaps exist between the plate and the flange.
Confirm that gaskets do not intrude into the bore.
Tighten bolts uniformly in a crisscross pattern.
A well-aligned plate heat exchanger allows fluids to flow evenly across the plates. The table below summarizes recommended alignment techniques:
Technique | Description |
|---|---|
Centerline Alignment | Align the plate’s centerline with the pipeline’s centerline. |
Perpendicular Face | Keep the upstream face perpendicular to the pipe axis, with minimal deviation. |
Gasket Usage | Use the correct gasket to prevent leaks and maintain flow integrity. |
Gasket Positioning | Ensure the gasket does not protrude into the pipe or alter flow patterns. |
Technicians check alignment at each step of the installation process. Proper alignment supports installation quality and reduces the risk of leaks.
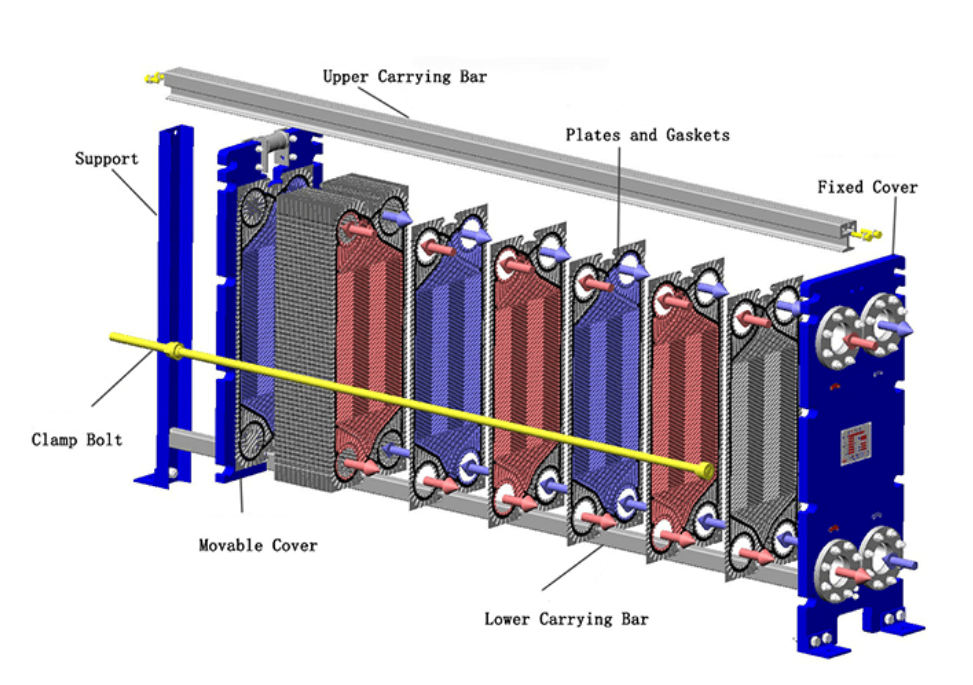
Assembly Sequence
The assembly sequence determines the overall success of heat exchanger installation. Technicians follow a step-by-step procedure to assemble the plate heat exchanger:
Place the plates horizontally on a clean, level surface.
Insert new gaskets into each groove, ensuring proper placement.
Stack plates in the correct order, following the manufacturer’s guidelines.
Align the plates and frame, checking for levelness and elevation.
Tighten bolts in a crisscross pattern to distribute pressure evenly.
Inspect the assembled heat exchanger for gaps, misalignment, or protruding gaskets.
Industry standards require technicians to install the heat exchanger horizontally and level it accurately. Permissible deviations after installation include elevation within 3 mm and verticality within 1/1000. Sliding supports allow free movement and prevent thermal stress. Technicians inspect the foundation, whether brick saddle or concrete, to ensure stability. Regular maintenance and inspections extend the service life of the equipment.
Note: Careful preparation and adherence to procedures during assembly help prevent leaks and support efficient operation. Technicians should always consult the manufacturer’s manual for specific guidelines.
Shanghai Heat Transfer’s plate heat exchanger, known for its modular design and easy maintenance, benefits from precise installation steps. Following these procedures ensures optimal performance and reliability for every heat exchanger installation. The brand heattransfer continues to set high standards in the industry by emphasizing proper gasket installation and alignment.
Installation Precautions
Torque and Tightening
Technicians must follow precise torque specifications during the installation process to protect the gasket heat exchanger and prevent leaks. Using a torque wrench ensures bolts reach the correct tightness without damaging the plate heat exchanger gaskets or the equipment. The following table shows recommended torque values for heat exchanger installation:
Component | Torque Specification |
|---|---|
Heat Exchanger End Cover Bolts | 15–20 lb-ft (20–27 N•m) |
Applying the correct torque helps maintain the seal and supports long-term reliability. Over-tightening can deform the gasket, while under-tightening may cause leaks. Technicians should tighten bolts in a crisscross pattern to distribute pressure evenly across the heat exchanger.
Alignment Checks
Alignment checks play a vital role in installation quality and equipment performance. Technicians use a step-by-step procedure to verify proper alignment:
Approach installation methodically to set a strong foundation.
Lay out plates in an alternating pattern, ensuring corrugations face the right way for counterflow.
Stack plates symmetrically on the frame, aligning ports dead-center to avoid offsets.
Position the movable plate parallel to the fixed one and bolt down in a cross-pattern, tightening diagonals first.
Use a torque wrench set to the specification, usually between 20-50 Nm, and tighten incrementally.
Measure the tightening dimension at four corners after each round, aiming for consistency within 3 mm across sides.
Cycle the unit dry to verify no binds before finalizing the installation.
Following these guidelines ensures the plate heat exchanger operates efficiently and reduces the risk of leaks.
Mistakes to Avoid
Technicians often encounter common mistakes during gasket installation. The table below highlights frequent errors and ways to prevent them:
Mistake | Preventative Measure |
|---|---|
Improper gasket positioning | Strictly follow installation instructions |
Uneven tightening bolt torque | Ensure bolts are evenly tightened to specified torque |
Scratches on sealing surface | Keep sealing surfaces clean and free of foreign matter |
Proper preparation and adherence to procedures help avoid these mistakes. Technicians should always use new gaskets and inspect the plate heat exchanger for damage before installation. The brand heattransfer recommends regular checks to maintain equipment performance and extend service life.
Post-Installation Checks
Pressure Testing
After installation, technicians must perform pressure testing to confirm the integrity of the gasket heat exchanger. This process ensures that the gaskets and equipment can handle operating conditions without leaks. The following steps outline a standard pressure testing procedure:
Inspect the heat exchanger for correct assembly and verify that all gaskets seal properly. Check inlet and outlet points, install blind plates, and prepare pressure gauges.
Gradually fill the system with water or another test medium. Increase pressure slowly using a hydraulic pump until it reaches 1.25 times the design pressure.
Monitor the pressure gauges and visually inspect the plate heat exchanger for leaks or escaping bubbles.
Slowly release the pressure after testing. Examine the equipment for permanent deformation or leaks. Address any issues before starting regular operation.
Proper pressure testing after preparation and installation protects the plate heat exchanger and supports long-term reliability.
Leak Detection
Technicians must check for leaks before the heat exchanger enters service. Effective leak detection methods include:
Plate inspection using dye penetrant or fluorescent testing to find pinholes or cracks.
Thickness checks to identify erosion or corrosion.
Visual checks for distortion, warping, or mechanical damage.
Gasket and tightening checks to ensure bolt torque and compression meet specifications. Replace damaged gaskets and always use new plate heat exchanger gaskets in sets.
Align integrity checks with annual heat exchanger maintenance. Train operators to spot early leak symptoms and keep spare gaskets and plates available. Use predictive tools like thermal imaging.
These steps help prevent leaks and extend equipment life.
Operational Verification
Before placing the heat exchanger into full operation, technicians must verify key parameters. The table below summarizes important checks:
Parameter | Verification Method |
|---|---|
Pressure and Temperature | Check for abnormal changes and record values regularly. |
Signs of Leakage | Look for visible leaks at gaps and interfaces. |
Abnormal Sounds | Listen for unusual noises that may signal internal problems. |
Fastening Bolts | Inspect for looseness, especially on the clamping plate. |
Consistent operational verification ensures the plate heat exchanger, including models from heattransfer, performs safely and efficiently. Regular checks support effective gasket replacement, cleaning methods, and ongoing maintenance.
Heat Exchanger Maintenance
Inspection Schedule
A regular inspection schedule helps maintain the reliability of a gasket heat exchanger. Technicians follow these steps to ensure the equipment operates safely:
Perform semi-annual to annual inspections.
Use non-destructive testing methods for thorough evaluations.
Apply ultrasonic thickness measurements to predict failure points.
Conduct eddy current testing to check tube integrity.
Use magnetic particle inspection to find cracks in ferromagnetic materials.
Perform penetrant testing for weld integrity and surface issues.
Routine inspections help identify problems early and support long-term heat exchanger maintenance.
Cleaning Methods
Proper cleaning methods extend the life of plate heat exchanger gaskets and improve equipment performance. The NGP Valhall Fluid, a biodegradable solution, removes rust, mineral scale, salts, and biological deposits without harming metal surfaces. This approach keeps gaskets in good condition. The table below shows common cleaning methods:
Cleaning Method | Description |
|---|---|
Chemical Cleaning | Specialized solutions dissolve scale and corrosion without damaging metal surfaces. |
Hydroblasting | High-pressure water jets remove stubborn deposits and smooth surfaces for better heat transfer. |
Mechanical Tube Cleaning | Brushes and tools remove debris, allowing close inspection of tube conditions. |
Hybrid Cleaning | Combines methods for specific materials and fouling levels. |
Technicians select compatible gasket materials, avoid sudden thermal and pressure shocks, and follow a regular inspection schedule to prevent early gasket failure.
Gasket Replacement
Gasket replacement is essential for safe heat exchanger installation and operation. Signs that indicate the need for new gaskets include:
Visible fluid leaks at gasket edges.
Pressure changes outside normal operation.
Lower than expected outlet temperatures.
Longer process times.
Increased energy use by pumps and heaters.
Technicians replace gaskets promptly to maintain plate heat exchanger efficiency. Regular preparation and cleaning methods help prevent unexpected failures. The heattransfer brand recommends following these steps for reliable equipment performance.
Troubleshooting Installation Issues
Identifying Problems
Technicians often face challenges during heat exchanger installation. Early identification of issues helps prevent damage to the equipment and ensures safe operation. They start with a visual inspection of the plate heat exchanger, looking for leaks, abnormal pressure drops, or temperature changes. These signs often point to problems with the gasket or the assembly process. Technicians use several diagnostic methods, such as pressure tests, tracer testing, acoustic detection, and infrared thermal imaging. Disassembly inspection can also reveal hidden faults. Common problems include loss of gasket flexibility, uneven tightening, or misplacement of gaskets. Sometimes, the gasket material corrodes or fails due to operation beyond the design temperature or pressure. Incompatibility between the gasket and the process medium can also cause early failure.
Solutions
When technicians find issues during preparation or operation, they follow a step-by-step approach to restore the heat exchanger. First, they replace any gaskets that show signs of wear, loss of elasticity, or chemical attack. They check the tightening torque and adjust it to the recommended value to prevent local leaks. If the gasket material does not match the operating conditions, they select a more suitable type. Technicians also ensure that the plate heat exchanger operates within its design limits. Regular maintenance and correct gasket selection help avoid future problems. The heattransfer brand recommends using only approved gaskets and following the manufacturer’s guidelines for every gasket heat exchanger. These steps protect the equipment and keep the heat exchanger running efficiently.
Following each step in gasket heat exchanger installation prevents leaks and extends equipment life. Proper gasket placement reduces leakage rates by up to 90% and increases pipeline lifespan by 15–20 years. The heattransfer team recommends consulting professionals for complex gasket issues.
Benefit | Description |
|---|---|
Reliable Performance | Solutions minimize leaks and improve heat exchanger efficiency. |
FAQ
How often should technicians inspect gaskets in a plate heat exchanger?
Technicians should inspect gaskets every six months. Regular checks help prevent leaks and maintain the efficiency of heattransfer equipment.
What gasket material works best for high-temperature fluids?
Viton gaskets handle high temperatures and aggressive chemicals. Heattransfer recommends Viton for demanding industrial applications.
Can technicians reuse old gaskets during maintenance?
Technicians should never reuse old gaskets. New gaskets ensure a proper seal and protect the heattransfer plate heat exchanger from leaks.